HubSpot CRM Integration
The HubSpot CRM plugin helps users track and manage attendee data and automate email marketing for events.
Installing the Plugin
The installation process is the same for all the add-ons offered by WP Event Manager. They can be installed both automatically and manually.
Automatic Installation: You can install the plugin from the backend of your WordPress. Click here to see how you can install the plugin automatically.
Manual Installation: You can also install the plugin manually using SFTP or FTP tools. Click here to see how you can install the plugin manually.
Obtaining HubSpot CRM Service Keys
To obtain your HubSpot CRM service key, follow the steps below:
Sign up or log in to your HubSpot account at https://app.hubspot.com/.
In your HubSpot account, click on the Settings icon in the main navigation bar.
Click on Legacy Apps.
Click on Create a service key.
On the Service Keys page, click on Create service key.
Add a name as per your requirement and click on Add new scope.
Under CRM, enable the required scopes:
crm.objects.contacts, Read and Write
crm.lists, Read and Write
crm.objects.owners.read
Click on Update to apply the selected scopes.
Click on Create.
In the confirmation window, click on Create again.
Copy your service key and use it for the HubSpot connection.
Paste the copied service key into the key field in HubSpot CRM Settings and click on Save Setting.
How to Create Segments in HubSpot
Go to the HubSpot CRM dashboard.
Click on More under CRM and select Segments. To show this section in the navigation, pin Segments.
Click on Create segment and select Manually.
Select Contacts and click on Next.
Change the segment name to the name you want to show in the segment list.
Click on Next to open the review screen.
Click on Save and process segment.
HubSpot CRM Settings in the Admin Panel
After the keys are connected, certain settings need to be performed in order to enable the functioning of HubSpot CRM.
Audience List Type Selection
Here, the admin gets an opportunity to select the list of contacts (audience list that has already been created in your HubSpot CRM account).
There are mainly two types of audience lists: one is an event-based list, and another is the list that syncs all the data.
Select Contact Owner
Select the contact owner name from the Select Contact Owner dropdown.
Select Create Module Record or Create/Update Module Record
Create Module Record: When the form is submitted, it will add a record.
Create/Update Module Record: If the submitted email address matches an existing record, it will update the record. If the submitted email address does not match an existing record, it will add a record.
Select HubSpot CRM Sync Type
There are mainly two types of HubSpot CRM sync types: Auto and Manual.
Auto
When you select the Auto sync type, the data gets synced automatically.
When you select the Auto sync type, you get 2 further options:
When New Created: As soon as a new user is registered, it is automatically synced to the HubSpot CRM list.
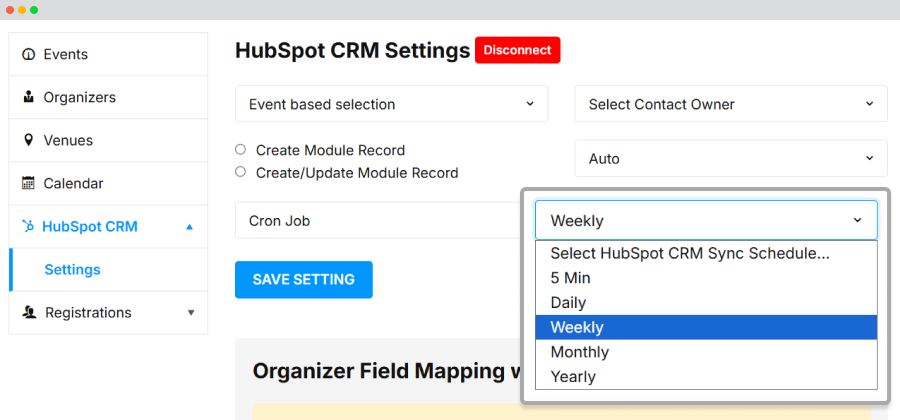
Cron Job: When you select Cron Job, you get an option to sync the data when the cron job is run: 5 Min, Daily, Weekly, Monthly, or Yearly.
Manual
When you select the Manual sync type, the data gets synced only after the admin manually syncs the data.
This type can be either on the basis of events or one list that syncs all the data.
Field Mapping with HubSpot CRM
Organizer List
The left-hand fields show you all the fields you generate from the organizer list form fields. The right-hand side fields are related to the HubSpot CRM form.
Registration Fields
The left-hand fields show you all the fields you generate from the registration form fields: WP Admin >> Event Registrations >> Registration Forms >> Form Fields.
The right-hand side fields are related to the HubSpot CRM form.
Please associate the correct attributes that you want to sync from Registration form fields to HubSpot CRM form fields.
Guest List
The left-hand fields show you all the fields you generate from the Guest List form fields. The right-hand side fields are related to the HubSpot CRM form.
Please associate the correct attributes that you want to sync from Guest List form fields to HubSpot CRM form fields.
Contact Organizer List
The left-hand fields show you all the fields you generate from the Contact Organizer form fields. The right-hand side fields are related to the HubSpot CRM form.
How to Manually Sync the Data at the Admin Panel
In order to manually sync the data, the user has to select the Manual option in the sync type while setting up the HubSpot CRM plugin.
Manually Syncing the Registration Data
Here are the steps you need to take to manually sync the registration data:
Go to WP Admin >> Event Registrations >> All Registrations.
Select the event and check the registrations to be synced.
Click on Bulk Action.
Click on Sync with HubSpot CRM.
Check the HubSpot CRM account.
The selected registration data will be synced.
Also, the status of the synced user can be seen in the HubSpot CRM column as subscribed, just before the user status on the same dashboard.
Integrating Service Keys at the Frontend for Organizers
The organizers can sync the registered user data from the frontend to their HubSpot CRM account.
Here are the steps you need to take to integrate service keys at the frontend:
Go to Event Dashboard >> HubSpot CRM >> Settings.
Copy the service key from the HubSpot CRM account and paste it into the key field.
Click on Save Settings.
HubSpot CRM Settings at the Frontend
After the keys are connected, certain settings need to be performed to determine the way the registered user data will be synced.
Audience List Type Selection
Here, the organizer gets an opportunity to select the list of contacts (audience list that has already been created in your HubSpot CRM account).
There are mainly two types of audience lists: one is an event-based list, and another is the list that syncs all the data.
Select Contact Owner
Select the contact owner name from the Select Contact Owner dropdown.
Select Create Module Record or Create/Update Module Record
Create Module Record: When the form is submitted, it will add a record.
Create/Update Module Record: If the submitted email address matches an existing record, it will update the record. If the submitted email address does not match an existing record, it will add a record.
Select HubSpot CRM Sync Type
There are mainly two types of HubSpot CRM sync types: Auto and Manual.
Auto
When you select the Auto sync type, the data gets synced automatically.
When you select the Auto sync type, you get 2 further options:
When New Created: As soon as a new user completes registration, the data gets automatically synced to the HubSpot CRM list.
Cron Job: When you select Cron Job, you get an option to sync the data when the cron job is run: 5 Min, Daily, Weekly, Monthly, or Yearly.
 Manual
When you select the Manual sync type, the data gets synced only after the organizer manually syncs it.
Select Custom Fields Type
Registration Fields
The left-hand fields show you all the fields you generate from the registration form fields: WP Admin >> Event Registrations >> Registration Forms >> Form Fields.
The right-hand side fields are related to the HubSpot CRM form.
Please associate the correct attributes that you want to sync from Registration form fields to HubSpot CRM form fields.
Guest List
If you have the Guest List add-on, you can map the guest list fields as well. The left-hand fields show you all the fields you generate from the Guest List form fields. The right-hand side fields are associated fields in the HubSpot CRM form.
Please associate the correct attributes that you want to sync from Guest List form fields to HubSpot CRM form fields.
Contact Organizer
The left-hand fields show you all the fields you generate from the Contact Organizer form fields. The right-hand side fields are associated fields in the HubSpot CRM form.
Organizer
The left-hand fields show you all the fields you generate from the Organizer form fields. The right-hand side fields are associated fields in the HubSpot CRM form.
How to Manually Sync the Data at the Frontend
In order to manually sync the data, a user has to select the Manual option in the sync type while setting up the HubSpot CRM plugin in the event dashboard.
Manually Sync Registration Data
Here are the steps you need to take to manually sync the registration data:
Go to Event Dashboard >> HubSpot CRM >> Sync Registrations.
Select the event and press Filter.
Tick the attendees to be synced.
Click on Sync.
Check the HubSpot CRM account.
The selected registration data will be synced.
Also, the status of the synced user can be seen in the HubSpot CRM column.
Manually Sync Guest Data
Go to Event Dashboard >> HubSpot CRM >> Sync Guests.
Select the event, and press Filter.
Tick the guests to be synced.
Click on Sync.
Check the HubSpot CRM account.
The selected guest data will be synced to HubSpot CRM contacts.
How to Sync Data based on Event from the Frontend
To sync data on the basis of events, select Event-based selection in the audience list type while setting up HubSpot CRM on the event dashboard.
Here are the steps you need to take:
Go to Event Dashboard >> HubSpot CRM >> Settings.
Click on Event-based selection in the audience list type.
Go to Event Dashboard >> Events.
Select the event and expand it by clicking on the three lines.
In the HubSpot CRM section, select the list that you want these event registrations to be synced to.
Similarly, select the list for all the events individually.
Now, these lists are saved for particular events.
Depending on your sync type, Auto or Manual, the lists will be synced. In case it’s Auto, the registrations will be synced automatically either when the user is registered or on the basis of a cron job. If the settings are Manual, you need to manually sync the attendees from Event Dashboard >> HubSpot CRM >> Sync Registrations.
Check the HubSpot CRM account.
The registration data will be synced.
See your synced data in the HubSpot CRM dashboard under Contacts.