The Registration addon streamlines the entire registration process and also makes it easy for attendees to register for an event. It also allows the organizers and admins to manage the registration form and registration dashboard.
Installing The Plugin
The installation process is the same for all the addons, offered by WP Event Manager. They can be both installed automatically and manually.
- 1.Automatic Installation : You can install the plugin from the backend of your WordPress. Click Here to see how you can install the plugin automatically.
- 2.Manual Installation : You can also install the plugin manually using SFTP or FTP tools. Click Here to see how you can install the plugin manually.
Watch the entire video for better understanding
Registrations Form
The Registration form is the form that an attendee needs to fill in to register for an event.
An attendee needs to click on the “Register for Event” button which can be found in the sidebar of the event detail page to get the registration form that contains various fields including Full Name, Email address and more.
Managing Registration Form Fields (adding, editing or deleting)
The Registration addon gives users the right to add, edit or delete registration form fields as per requirements from the Backend.
Here are the steps you need to take to perform that:
WP-admin >> Event Registration >> Registration Form.
This helps admins choose the type of information he wants from the attendees during the registration process.
Registration Form Settings
As mentioned above, an admin can control the behavior of the registration form through the backend with the settings options.
Here are the steps to be followed:
WP-admin >> Event Registration >> Settings >> Registration form
Here are the list of options you will get under the “Registration Forms” tab:
- User Restriction: when the option “Only allow registered users to register” is enabled, only logged in users will be able to register and other users will be asked to login at first.
- Multiple Registration: when the option “Prevent users from registering to the same event multiple times” is enabled, the registration form will be hidden from the user who has already completed the registration.
- Duplicate email: if you enable the Duplicate email option, you can restrict people from registering with the same email id multiple times.
- Organizer Email notification: An organizer will be notified with an email message as soon as a visitor registers for his event.
- Attendee Email notification: An attendee will be notified with an email message as soon as he or she completes the registration process through his or her email id.
- Enable unregister attendee email notification: An email notification is sent to the organizer when a registered attendee de-register for an event.
- Canceled Event Email Notification: An Email notification is sent to the attendees when an event is canceled.
- Checkin event email notification: An email notification is sent to an organizer when an attendee checks into an event.
- New registration default status: This points out the status that you want to keep for those who have completed the registration process for your event or events. This could be New/Confirmed/Waiting/Canceled/Archived.
- New registration notification status: This signifies the stage of registration at which an attendee should be notified. This status includes New/Confirmed/Waiting/Canceled/Archived.
- Send event registration mail notification: Here, a user can either send the registration confirmation mail to the event organizer or to the registrant’s email id. The user needs to choose in between these two options.
For example, If a new user’s default status is new, and registration notification status is confirmed, the user will get notification only after the admin or the Organizer changes the status from new to confirmed.
Disable this option if you want to allow visitors to register for the same events multiple times.
Registration Management Settings
In the settings section, you can see the Management tab beside the Registration Forms Tab.
1. Go to WP-admin >> Event Registrations >> Settings >> Management:
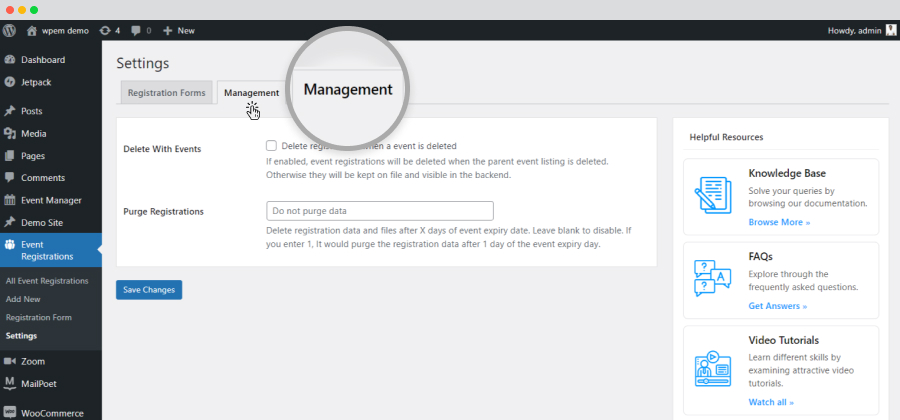
- Delete with Events: If this option is enabled, event registrations will be deleted when the parent event listing is deleted. Otherwise they will be kept on file and visible in the backend.
- Purge Registrations: Purge registration data and files after particular days.This means that you need to mention the number of days after which the data will be deleted. This number of days is applicable from the day of Event expiry. You can enter a negative value if you want to purge the data before expiry date. For example, if entered 1, it will delete the data after 1 day of event expiry date and if you enter -1, it will purge the data one day before the event expiry.
2. Save changes.
Frontend Event Registration
All the event registration received from the attendees can be managed from the frontend registration dashboard as well as the backend registration dashboard.
Organizers can manage registration from the frontend registration dashboard whereas admins can manage all the registration from the backend registration dashboard.
The Frontend Registration dashboard allows event organizers to see all the registration details including the total number of registrations and more. It gives them the right to make changes to the registrations for specific events like adding editing, duplicating or changing status etc.
There are mainly two ways through which You can access the registration details of a specific event.
Follow the below mentioned steps for the first method:
- Go to the Event Dashboard.
- Click on the Events option, present at the left side of the page.
- Here, you can see the list of all events along with some actionable icons,present right beside the name of each event.
- By clicking on the Details option from the iconsof a specific event, you can get the total number of registrations done for that particular event. You can click on the View Attendees button to view all the registration details for that specific event will be displayed.
- Go to the Event Dashboard.
- Select Registration.
- Click on List from the drop down.
The List button will take you to the Event Registration List.
Here, you can access the registered attendee list of a specific event.
To access the list of registrations of an event, you will get the following filters.
- Select event: the download displays all the events from which you need to select the one that you want to access.
- Type text and press enter: here, you need to enter the name of the event.
- Filter by status: you can filter events based on their status.
- Newest first: this drop down menu helps you sort events by name or order.
The registration details of a specific event includes the following:
- Total number of registration.
- New registrations.
- Confirmed registrations.
- Waiting list.
- Canceled registration list.
- Archived.
Attendee List
The following the things that you will be able to see in an event attendee list:
- The name of the attendee.
- Registration status, right beside the name of the attendee.
- Check-in option.
Here are the following options you will get to manage the attendee registration list for each attendee.
- Pencil icon:this icon lets you edit the registration status of an attendee. If you make any changes to the attendee status, you need to click on the Save Changesoption after completing it. You also have the Delete option here to delete the registration detail of a specific attendee.
- Paper icon:it lets you add a note to the attendee details.
- Details icon:it lets you access the details of an attendee that he or she has filled up during registration.
Graphical representation of Registration report
To get a graphical representation of your registration report, here are the steps you need to take:
- Login to your Organizer account or admin.
- Go to Event dashboard.
- Click on Registration.
- Select Report.
- Here you will see the All Report option along with the View Report button.
- You can use the All Event option to get the registration report of all your events.
- For a specific Event Registration Report you need click on the All Event option and choose the desired event from the dropdown and click on the view report button.
You will be able to see the graphical representation of the event registration report.
Backend Registration Dashboard
Just like the frontend event registration dashboard, admins can access all the attendee registration details in the backend registration dashboard.
To go to the backend registration dashboard, here are the steps you need to take:
WP-admin >> Event Registrations >> All Event Registrations for admin to manage the event registrations.
Admins also enjoy the rights to access and manage the registration details of each event that is listed on his or her website.
At this page, you can view the registration details of all events and the details include:
- New.
- Confirmed.
- Waiting.
- Canceled.
- Archived.
Here are the event filtering option, you will get:
- Bulk actions: it lets you edit, delete or sync data of bulk events.
- All Dates: it lets you specify the date of the event which you are looking for.
- Registration for all events: the drop down menu allows you to specify an event’s name to view its details.
- Select Organizer:it allows you to specify an organizer to view the total number of registrations done for that organizer’s event.
You, as an admin can also view, delete and print events from the entire list by using icons that are present at the right most corner of each event.
- Pencil icon: lets you edit the registration details of a specific event .
- Bin icon:lets you delete a specific event.
Adding a new registration from the backend
Not just the voluntary registration from the front end, this plugin also allows the admin of the website to manually add the registration details of an attendee for an event.
Here are the steps that have to taken:
- Go to WP-admin >> Event Registrations >> Add new.
- Fill in the form with necessary event details.
- Save changes.
An alternative way to do the same is by simply clicking on the Add New option that is present at the top of the All Event Registrations page.
Registered Status At Event Listing
As shown in the image, a green colored “registered” status will be displayed under the event title for all those events which have already been registered by that visitor. So, visitors do not need to remember and register the same event again.
1. My Registrations
In order to set up a My registration page, you need to follow the below-mentioned steps:
It will list all the registrations that have been done by the current logged in user.
Another shortcode for my registration is mentioned below:
[past_registrations posts_per_page='15']
The shortcode allows a registered attendee to mention the number of his or her registrations that can be viewed per page.
attribute:
‘posts_per_page’ => ‘integer_value’
Accessing Past Registration details
With the Registration addon, it is possible for users to access the registration details of past event registration of a specific attendee with the help of a shortcode.
Follow the below mentioned steps:
Another shortcode for past registrations is mentioned below:
[past_registrations posts_per_page='15']