Zapier Integration
Installing the plugin
The installation process is the same for all the addons offered by WP Event Manager. They can be installed both automatically and manually.
- Automatic Installation: You can install the plugin from the backend of your WordPress. Click here to see how you can install the plugin automatically.
- Manual Installation: You can also install the plugin manually using SFTP or FTP tools FTP tool as well. Click here to see how you can install the plugin manually.
Once you install the Zapier plugin, you need to activate it using the following path on the admin side:
1. wp-admin>>Plugins>>installed plugins>>Zapier integration>> Activate.
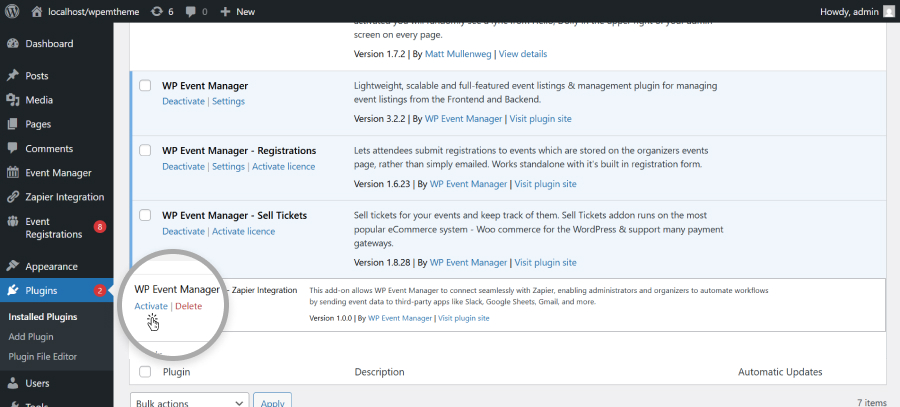
After activating the Zapier integration plugin, you will be able to see the Zapier integration option on the admin side.
Zapier integration settings :
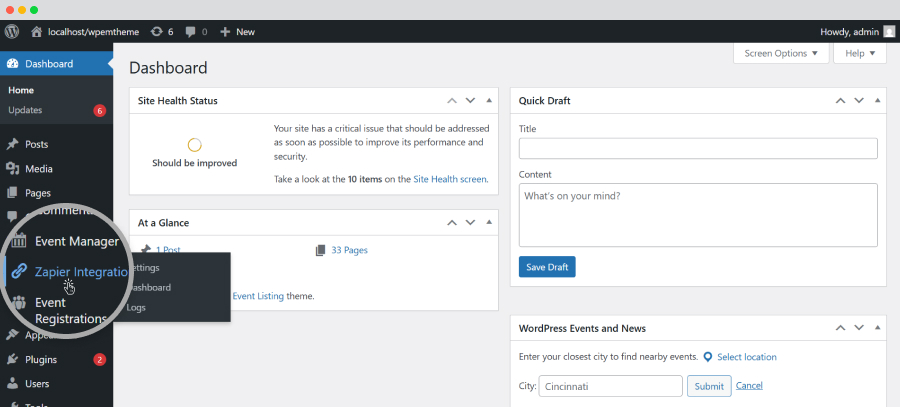
2. Go to wp-admin.
3. Click on the Zapier integration option.
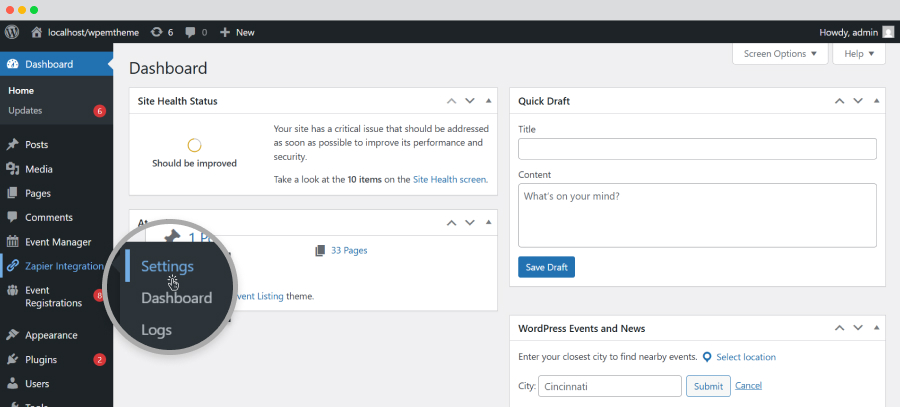
4. Select the Settings option.
5. Here, you can enable or disable the Zapier functionality by checking or unchecking the box.
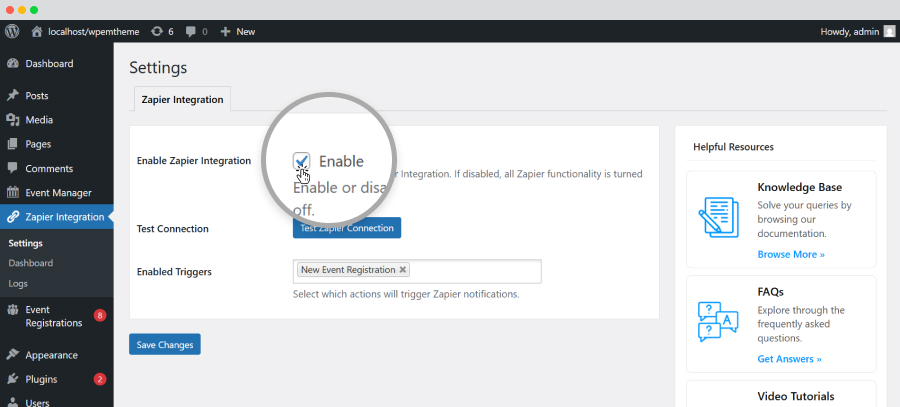
Once you enable the option, you will get two more options:
6. Test Connection: Clicking on this option, you will be asked to paste the Zapier webhook URL in the box. The steps to get the webhook URL are also mentioned here.
7. Click on the Zapier account link.
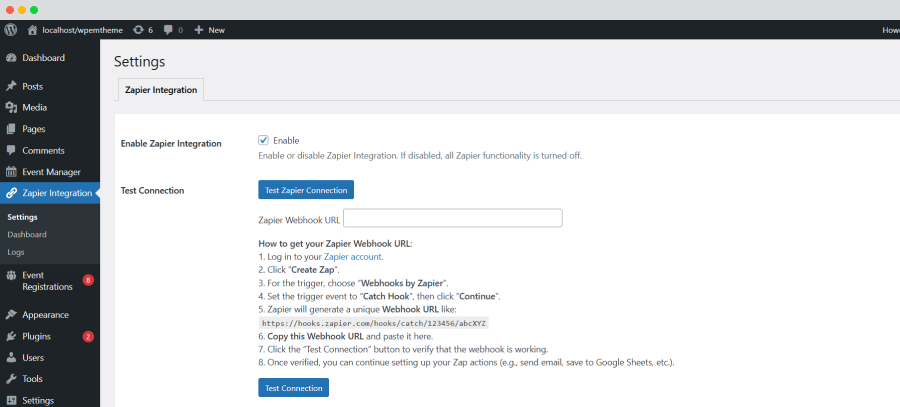
8. You need to log in to your Zapier account if you already have an account, or else you need to sign up to create a new account.
[You will get a free trial for 14 days, and after that, you need to pay to continue using it]
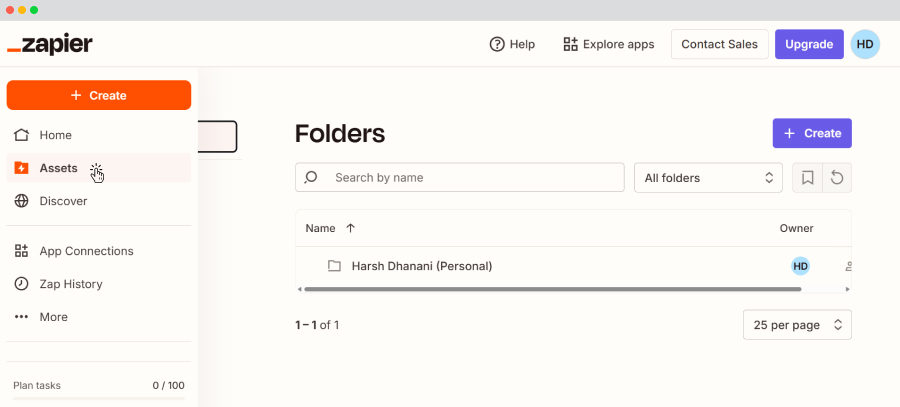
9. After logging into your account, click on "Assets" and select the "Zaps" option.
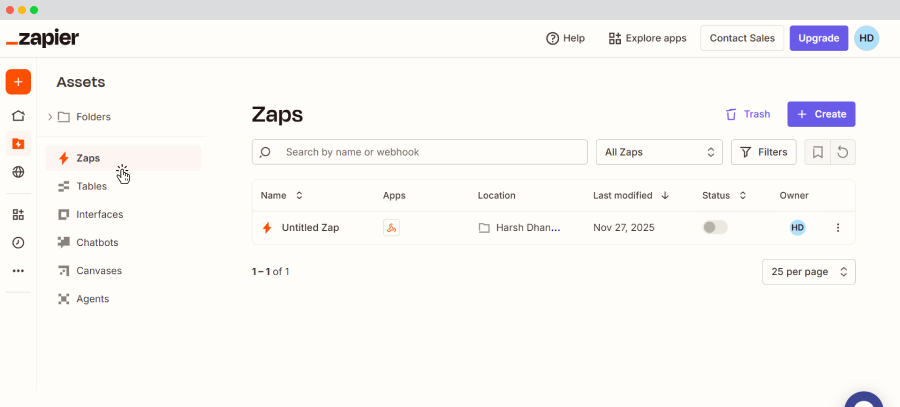
10. Click on "Create Zap".
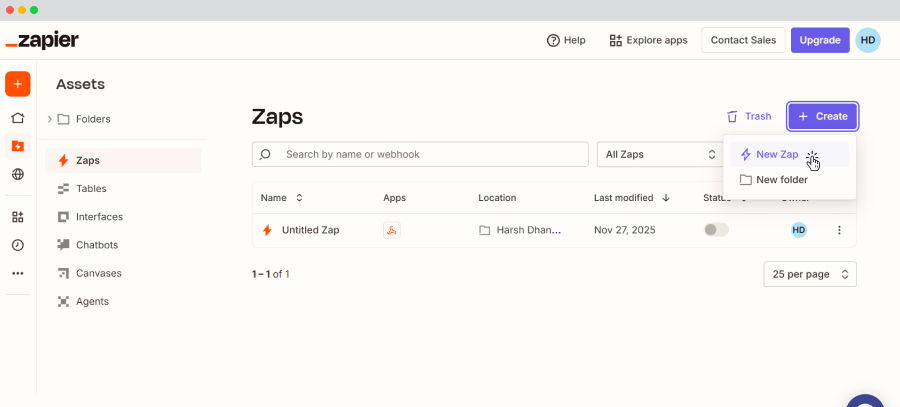
11. You will be redirected to a page where you will get two options:
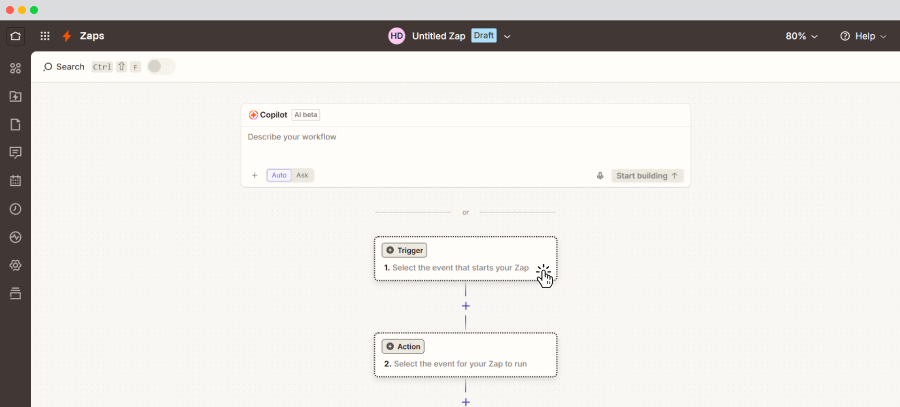
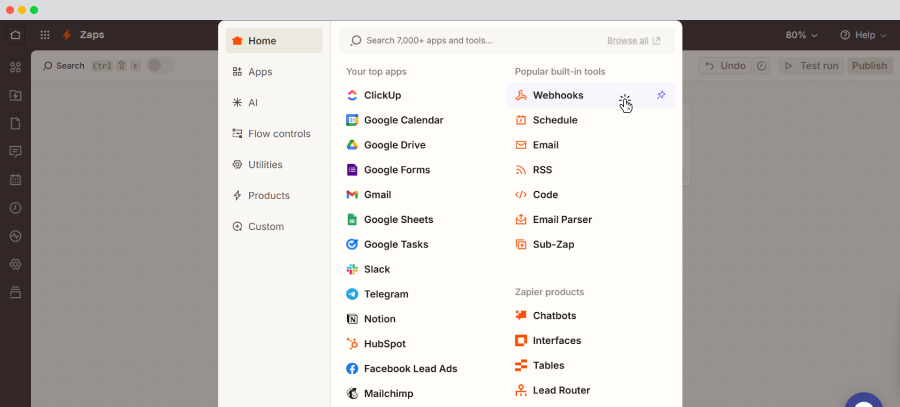
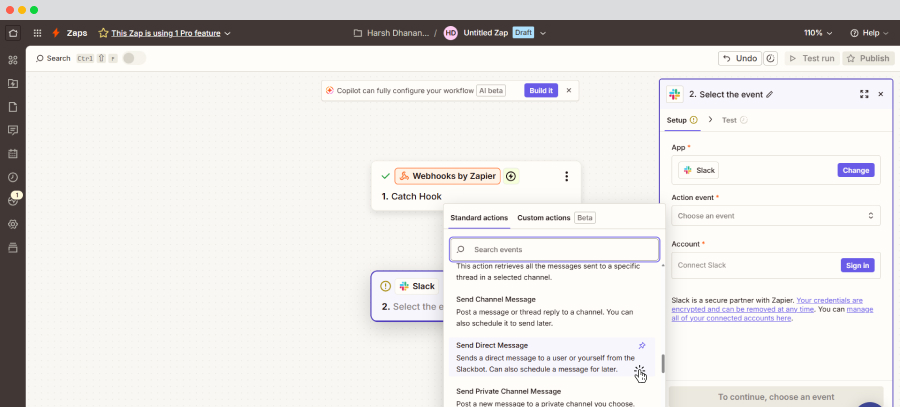
12. Trigger: Click on Trigger and select the "Webhook by Zapier" option.
13. Then select the "Catch hook" option from the "Event trigger" drop-down.
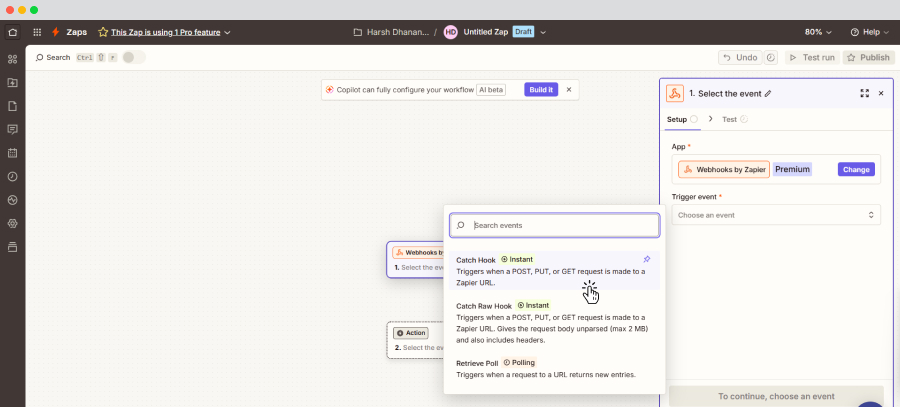
14. Click on Continue.
15. Here, you will get the Webhook URL that you need to copy and paste into the Zapier webhook URL box.
3. Click on the Zapier integration option.
4. Select the Settings option.
5. Here, you can enable or disable the Zapier functionality by checking or unchecking the box.
Once you enable the option, you will get two more options:
6. Test Connection: Clicking on this option, you will be asked to paste the Zapier webhook URL in the box. The steps to get the webhook URL are also mentioned here.
7. Click on the Zapier account link.
8. You need to log in to your Zapier account if you already have an account, or else you need to sign up to create a new account.
[You will get a free trial for 14 days, and after that, you need to pay to continue using it]
9. After logging into your account, click on "Assets" and select the "Zaps" option.
10. Click on "Create Zap".
11. You will be redirected to a page where you will get two options:
12. Trigger: Click on Trigger and select the "Webhook by Zapier" option.
13. Then select the "Catch hook" option from the "Event trigger" drop-down.
14. Click on Continue.
15. Here, you will get the Webhook URL that you need to copy and paste into the Zapier webhook URL box.
Once you get the Webhook URL, click on the Test Connection button.
If it is connected successfully, you will see the message: “Connection successful! Zapier received the test payload.”
If the connection fails, an error message will be displayed.
16. If it fails, you need to go back to the Zapier webhook URL page and click on Test Trigger and Continue.
Action
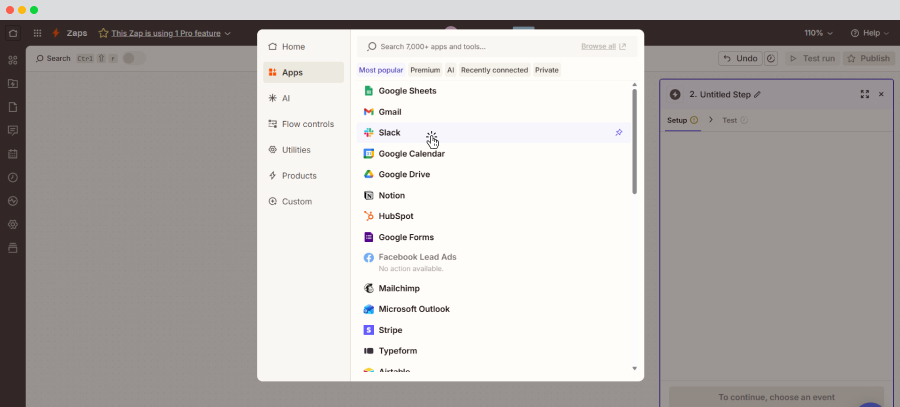
17. Here you will get more than 7000 apps to connect.
16. If it fails, you need to go back to the Zapier webhook URL page and click on Test Trigger and Continue.
Action
17. Here you will get more than 7000 apps to connect.
18. Lets select Slack here. You can choose anything you want.
19. Then you have to select an option from the "Action Event" dropdown. Select the "Send direct message" option.
20. The next section is "Account," in which you need to mention the account where you want to receive the messages.
21. Click on Continue.
19. Then you have to select an option from the "Action Event" dropdown. Select the "Send direct message" option.
20. The next section is "Account," in which you need to mention the account where you want to receive the messages.
21. Click on Continue.
Then you will come to the Configure section, in which you need to fill in the following details:
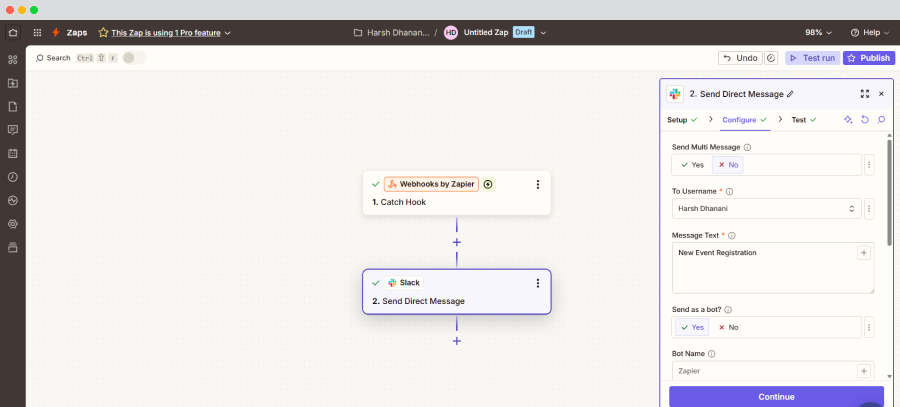
22. Username
22. Username
- The message text that you want to send.
- Then come to the Test section and click on Continue. Then you will instantly receive the message that you pasted in the message box on your Slack from Zapier.
23. Enable trigger: Here, you need to put the situations in which you want notifications to be sent. For example, when a new event is created, a new organizer is created, and more. Once done, click on Save changes.
Zapier Log and Dashboard
Follow the steps below to access the Zapier log and dashboard:
1. Go to the wp-admin.
2. Click on Zapier integration and select Dashboard.
2. Click on Zapier integration and select Dashboard.
3. Here you can add, edit, or delete webhooks as per requirements.
4. In addition to that, in the Log section, you will get to see the Webhook status for each event as well.
Once you are done with the above mentioned changes in the admin side, go to the
Frontend and follow the steps mentioned below:
5. Go to the Frontend event dashboard.
6. Click on Zapier and select Dashboard.
7. To add a new Zapier webhook, click on the "+" sign.
8. You will be redirected to a new page on which you need to paste the Zapier Webhook that you have generated.
9. Then select an event from the Event dropdown menu.
10. The next step is to select Event triggers.
11. In the Zapier payload section, you will see the data that you have added in the Zapier admin side.
12. Click on Add Zapier Webhook.
13. You will see a message that "Zapier webhook successfully added".
14. Go to the Zapier Dashboard.
15. You can filter Zapier webhook triggers using event filter.
16. From this dashboard, you can easily edit or delete webhooks using the Pencil and Bin icons.
17. You can view the status of each Zapier webhook in the Logs section.
Related Articles
Zoho CRM Integration
The Zoho CRM addon lets users maintain better communication with their website visitors through live chats, calls, emails etc. Installing The Plugin The installation process is the same for all the addons, offered by WP Event Manager. They can be ...HubSpot CRM Integration
The Hubspot CRM addon allows users to monitor how your target audience communicates with their company websites. In simple words, it helps them track user behavior on their WordPress sites. Installing the plugin The installation process is the same ...Salesforce CRM Integration
The Salesforce CRM lets users synchronize attendee details that attendees provide during the event registration process. Installing the plugin The installation process is the same for all the addons, offered by WP Event Manager. They can be both ...WP Seats Integration
WP Seats Installation The installation process is the same for all the addons offered by WP Event Manager. They can be installed both automatically and manually. 1) Automatic Installation: You can install the plugin from the backend of your ...Zoom
The Zoom addon offered by WP Event Manager is a one-stop solution for WordPress users that offers robust tools to conduct virtual meetings, conferences and more. The Zoom addon is a very convenient tool for event organizers as it allows them to ...